Protecting your private files and folders is extremely important in today’s digital world. Whether you are storing personal photos, financial documents, office files, or confidential data, keeping them secure from unauthorized access is essential. Windows 11 does not directly allow you to lock a folder with a password, but it offers multiple safe and powerful methods to protect your files using encryption, virtual drives, and third-party tools.
In this complete guide, you will learn all the working methods to protect a folder with a password on Windows 11, step-by-step. These methods include BitLocker, 7-Zip, Personal Vault, file encryption, and more.
Why You Need to Protect Folders on Windows 11
Data security has become more important than ever. Anyone using your PC — family members, office workers, or even strangers — may access your private files if they are not protected. Windows 11 is secure, but it does not provide a built-in option to add a password to a folder.
This is why users rely on BitLocker, virtual drives, and password-protected archives to secure their data. Not only does this keep your files safe, but it also prevents data leaks, unwanted access, and unauthorized copying.
Most importantly, these methods ensure that even if someone steals your laptop or hard drive, they cannot see your personal data without entering the password.
1. Protect a Folder with a Password Using BitLocker (Most Secure Method)
BitLocker is Microsoft’s built-in drive encryption tool. While Windows does not allow direct password protection for folders, you can create a virtual encrypted drive and store all your files inside it. This is the safest and most professional way to protect folders on Windows 11.
Step 1: Create a Virtual Drive (VHD/VHDX)
A virtual drive works like a real drive but behaves like a folder that can be locked and unlocked.
- Open Settings > System > Storage.
- Click Advanced storage settings > Disks & volumes.
- Scroll down and tap Create VHD.
- Name your virtual drive (example: SecureFolder).
- Choose size (Recommended: 5GB–20GB based on your files).
- Select VHDX and choose Dynamically expanding.
- Click Create.
- Now choose GPT as partition style.
- Format as NTFS, name it, and click OK.
Your new encrypted drive appears in File Explorer like a normal drive (E:, F:, etc.).


Step 2: Add Password Protection Using BitLocker
Now that your drive is ready, let’s lock it.
- Go to Settings > System > Storage again.
- Open Advanced storage settings > Disks & volumes.
- Select the newly created VHDX drive.
- Click Turn on BitLocker.
- Select Use a password to unlock the drive.
- Enter a strong password (mix letters, numbers, symbols).
- Save your recovery key safely (Microsoft account recommended).
- Choose Encrypt used disk space only.
- Click Start encryption.
Your drive is now fully password-protected. Only users with the password can open it.
Step 3: Lock & Unlock Your Secure Folder
To unlock:
✔ Double-click the VHDX file → Enter password → Access files.
To lock:
✔ Right-click the secure drive → Eject → It locks automatically.
This method is extremely safe, even against hackers.
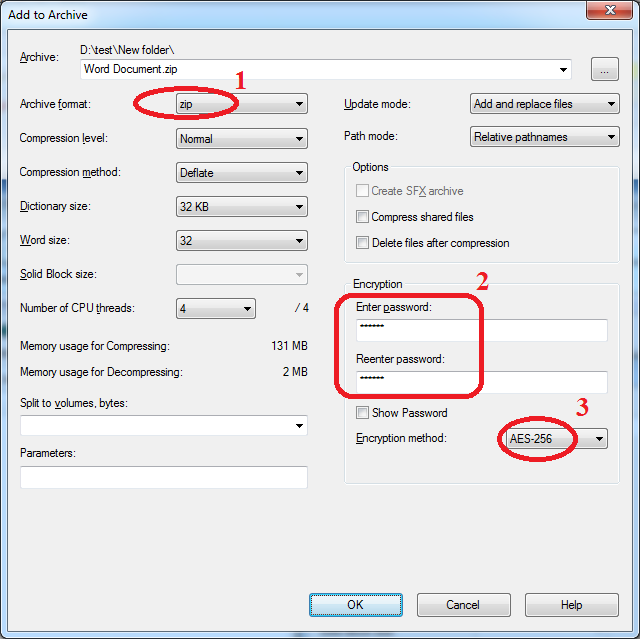
2. Protect a Folder with a Password Using 7-Zip (Quick & Free Method)
If you want something fast, easy, and free — 7-Zip is the best tool. It allows you to convert any folder into a password-protected archive with AES-256 encryption (military-grade security).
Steps to Use 7-Zip
- Install 7-Zip (free and open-source).
- Right-click the folder you want to protect.
- Click Show more options > 7-Zip > Add to archive.
- Under Encryption, type your password.
- Set Encryption method: AES-256.
- Set compression level to Store (fast + secure).
- Click OK.
A new .7z file appears — this is your password-locked folder.
Anyone who wants to open it must enter the password.
Extra Tip: Hide the Encrypted Folder
If you want more privacy:
- Right-click the .7z file → Properties.
- Tick Hidden.
- Apply changes.
To view it later: File Explorer → View > Show > Hidden items.
This method is perfect for users who want fast protection without complex setups.
3. Use OneDrive Personal Vault (Cloud Protection)
OneDrive includes a highly secure feature called Personal Vault, which protects your files with:
✔ BitLocker encryption
✔ 2-Factor authentication (password + OTP)
✔ Automatic locking
✔ Secure sharing disabled
This method is ideal for sensitive documents like IDs, bank statements, certificates, or personal photos.
How to Use OneDrive Personal Vault
- Open OneDrive from the taskbar.
- Click Unlock Personal Vault.
- Verify identity using OTP.
- Drag and drop files into the Vault.
The Vault locks automatically after 20 minutes of inactivity.
4. Password-Protect Microsoft Office Files (Word, Excel, PowerPoint)
If your sensitive data is inside a document, you can add a password directly.
Steps:
- Open the document.
- Click File > Info > Protect Document.
- Select Encrypt with Password.
- Enter a strong password.
- Save the file.
Next time anyone tries to open the file, it will ask for the password.
⚠ Note: If you forget the password, the file is permanently locked and cannot be recovered.
5. Use Windows File-Level Encryption (Simple Local Security)
Windows also allows you to encrypt files so other users on the same PC cannot access them.
Steps:
- Right-click the folder.
- Select Properties > Advanced.
- Tick Encrypt contents to secure data.
- Click Apply.
A small lock icon appears beside the folder.
Only your Windows account can open it — other users cannot.
6. Use BitLocker to Encrypt Entire Drives
If your sensitive data is spread across entire drives, this method is useful.
Steps:
- Search Manage BitLocker.
- Select the drive (C:, D:, E:).
- Click Turn on BitLocker.
- Choose password unlock.
- Save your recovery key.
- Restart your PC.
No one can access your drive without the password.
7. Use Third-Party Folder Lock Software (Optional)
You can also use dedicated folder-locking software:
- Folder Lock
- IObit Protected Folder
- My Lockbox
- SecretFolder
These tools provide easy one-click folder locking.
However, free versions may include ads or limited features.
For maximum security, BitLocker is always recommended.
Best Practices for Protecting Folders on Windows 11
To keep your data safe, follow these security rules:
✔ Use strong passwords
Avoid simple passwords like 12345 or your name.
Use a combination of numbers, letters, and symbols.
✔ Never share your encryption password
Once someone has the password, they can access everything.
✔ Keep your recovery key safe
Store it in your Microsoft account or external drive.
✔ Backup important files
Use OneDrive, Google Drive, or an external hard disk.
✔ Keep Windows updated
Security updates protect your encryption from vulnerabilities.
Final Thoughts
Protecting folders on Windows 11 is easy if you follow the right method. Whether you choose BitLocker, 7-Zip, OneDrive Vault, or Office encryption, each option provides strong security and ensures your private data stays protected from unwanted access.
For maximum safety, use BitLocker encrypted virtual drives.
For quick protection, use 7-Zip.
For cloud safety, use OneDrive Personal Vault.